|
How-To: Replace the DVD-Rom Drive in Your XboxPosted on Tue, Nov 16, 2004
For this project you will need a Torx20 and Torx10 screwdriver. You can pick up these screwdrivers at your local Ace Hardware or other local hardware store. Proceed at your own risk; we take no responsibility for damage done to your Xbox or any warranties that could possibly be voided.
If you are one of the thousands of people who get the infamous "dirty disc" errors on your Xbox or if you are experiencing a major slowdown in your game loading speed, then you are most likely one of the unfortunate people suffering from an Xbox that has a faulty or deteriorating DVD-Rom drive. In this event, try running a DVD-Rom lens cleaning disc (2 brushes on the disc) in your Xbox to see if you can resolve the problem without having to open your Xbox up. These discs generally cost around $10 and are a good investment because they typically work for CD and DVD drives.
If the DVD-Rom lens cleaning disc does not solve your problem and your Xbox is no longer under warranty, you may wish to avoid dealing with Microsoft and paying repair fees by replacing the DVD-Rom yourself. Alternatively you could try and replace the laser for the DVD-Rom, but that is not something we will cover in this article.
Begin by logging on to www.ebay.com or another site and order a DVD-Rom made for Xbox. There are three types of DVD-ROMs made specifically for Xbox including the Thomson TGM600, Phillips (unspecified model number), and Samsung SDG-605. A replacement Thomson drive will cost you around $30-40, a Phillips drive will cost you upwards of $60, and the Samsung is the most expensive at around $80. Beware of the Thompson model because it's known to be the slowest and most problematic.
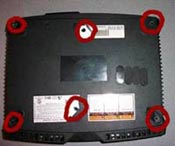
After you order and receive a working DVD-Rom you will need to open your Xbox. Begin by unplugging everything and turning you Xbox upside down. There are four small pads on the corners of your Xbox that will need to be pulled off, as well as parts of the warranty and serial stickers. Under these are Torx20 sized screws that you will need to remove. Do not attempt to unscrew your Xbox without the proper sized screwdriver.
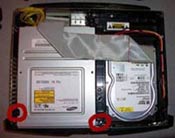
After you remove these screws turn your Xbox right side up. You should be able to pull off the top part of the case with relative ease. You will then see the DVD-Rom on the left and the hard drive on the right. Remove the IDE (wide and gray) cable and unscrew the two Torx10 screws on each side of the DVD. Be careful not to lose any screws.
There are clips on each side of the DVD-Rom that you should press in, and then gently lift the DVD drive upwards. If it feels like it won’t budge, do not force it; be patient and try again. After the DVD drive is lifted from the case pull out the power plug (it’s easiest to wait until now to do it). If you need to reuse the faceplate on the DVD drive, slide it upwards until it comes off. Then slide it downwards on the new drive until it’s aligned properly.
Take the new DVD-Rom and lower it into the area that the previous drive came from, making sure the faceplate aligns evenly in the front of the Xbox. Plug the IDE cable and power cable back in the same way you took them off, and screw the Torx10 screws back into their places.
Take the top of your Xbox case and lower it onto the shell so that it aligns properly in the front, then push it down until it clips in and is even on both sides. After that turn it upside down again and proceed to screwing the Torx20 screw back in (do not screw them in too hard). Put the pads back onto the corners, and plug your Xbox cables back in the same way that you took them out.
Tada, if you followed the steps your Xbox should now read discs again and work properly! Posted By: Adam Paoli - 22640 Reads
Go Back |
Features Index |
Post About It
|